> ## Documentation Index
> Fetch the complete documentation index at: https://docs.solidyne.ar/llms.txt
> Use this file to discover all available pages before exploring further.
# CyberPlay Editor: Usage and Features
> Using CyberPlay Editor
## Loading and Saving Files
### Individual Loading of LOG / PGM Files
This procedure applies to both **LOG** and **PGM** windows.\
It allows loading files individually, although they can also be loaded together (see next section).
When pressing the load button, a window appears with dropdown menus to select:\
**Day – Day of the week – Month – Year**.\
You can also select a file directly from the list on the right.
File names always correspond to the date for which they were generated, as explained in the previous section.
***
## Loading Complete Programming by Date
When **CyberPlay Editor** opens, it automatically loads the **commercial breaks** and **program blocks** files for the **current day**.
The **load by date** button allows simultaneous selection of **LOG** and **PGM** files for a specific date.
Click the corresponding button and select the date in the calendar.\
Confirm with **OK**.
CyberPlay Editor will load LOG and PGM files following the priority order explained in the previous section.\
It will then generate a **graphical preview** in the **Test CyberPlay** window.
Once loaded, LOG and PGM files can be edited and saved independently.
***
## Saving LOG / PGM Files
Pressing this button saves changes made to a LOG or PGM file.\
The save window is similar to the one used for loading files.
* To create a **new file**, enter a name and press **OK**.
* If the name doesn't exist, a new file will be created for the specified date.
* If it already exists, a dialog box will appear to confirm replacement. Accepting will overwrite the previous file.
The **Year** field always shows: the previous year and the two years following the current year.\
AUDICOM includes **sample files** (7 LOG and 7 PGM), which should be deleted to avoid interference with actual programming.
***
## PlayLists – Title Lists
Within the **Save PGM** window, there is a specific button for saving **PlayLists**, which are title lists in **TXT** format that can be inserted into the on-air programming schedule.
* When pressing the button, a box appears to enter the **PlayList** name.
* This name will be displayed by the **PlayList Manager**, which manages these lists in the On-Air module.
* PlayLists are always saved in the **PGM** folder.
When checking the **Show PlayList only** box, the window will display only this type of files.
Playlists can also be created directly by operators from the On-Air screen using the **PlayList Manager**.
***
## Entering Titles in LOG and PGM Windows
There are three ways to enter titles in the **LOG** and **PGM** editing windows:
* **Manual typing** (writing directly).
* **Drag & Drop** from **File Manager**.
* **Drag & Drop** from **InfoMusic**.
***
## Programming Test (F9)
The **CyberPlay preview** window graphically shows how the **programming schedule** is organized.
* When pressing **Test**, the graph is generated based on commands entered in **LOG** and **PGM**.
* The graph simulates what the **On-Air operator** will see.
* Simultaneously, a **validation** of the programming is performed, and results are shown in the **STATUS** window below LOG and PGM.
***
### Test-CyberPlay Window
The **Test-CyberPlay** window allows you to **verify and modify** entered commands.
When pressing **TEST**, the following aspects are verified:
* **Scheduled files**:
* If a title doesn't correspond to any file, it appears in **RED**.
* In the On-Air module, that file will be **ignored**, marked as error, and playback will continue with the next one.
* **AutoDJ Formats**:
* The existence of assigned formats is validated.
* If a format doesn't exist, it appears in **STATUS** and must be corrected from PGM.
* If not corrected, the block will be built with the **Default** format, which includes all styles available in the Database.
### Listening to Scheduled Titles
From the **Programming Terminal** (requires installed sound card):
* Select a title in the **CyberPlay** window.
* Press **PLAY** to preview it.
***
## Changing the Schedule from the Preview Window
The **preview window** allows direct modification of various aspects of the **programming schedule**.
* **Right-click on an item** opens a menu with the following options:
* **PLAY / STOP** → Playback controls (if the item is an audio file).
* **INSERT METEOR** → Inserts a **METEOR** instruction above the selected item.
* **INSERT PAUSE** → Inserts a **PAUSE** above the selected item.
* **REMOVE** → Removes the selected item.
* For a **commercial spot**, only **that occurrence** is removed.
* To remove **all occurrences** of the spot, use **Magic Programming** (this function will soon be available in the context menu as well).
* Complete blocks cannot be deleted from this menu.
* Each change made in the preview window automatically generates the **corresponding code** in the **LOG** or **PGM** window (as appropriate).
* **Double-click** on an item in CyberPlay shows the **code line** that generates it in the corresponding instructions window.
### Changing File Positions
You can **reorder scheduled files**:
* Click on a title and drag it up or down.
* You can also drag **pauses** or **Meteor commands**.
* **Commercial breaks and program blocks cannot be moved**.
To change the **start or end time** of a block:
* Double-click on the **block header** → the code is shown in LOG or PGM.
* Directly edit the code line with the desired time.
Always visually verify the programming.\
Errors such as **time overlaps**, **gaps**, or **non-existent titles** must be corrected.\
Otherwise, programming in the **On-Air Module** will be incorrect.
***
## Multiple On-Air Terminals
From a **Production terminal**, you can **navigate and operate** on any of the network terminals. This is useful when there are multiple active On-Air terminals, as it allows managing the programming of either one.
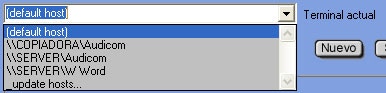 * The **"Current terminal"** dropdown menu shows all available terminals.
* The **"Default host"** value always points to the **local terminal**, unless the administrator redefines the default configuration in `audicom.ini`.
* If you select an **On-Air terminal**, its **programming files** will be displayed, allowing you to work directly with its **LOG/PGM**.
When deploying the menu for the first time, the system scans the network for **active AUDICOM terminals**.\
This process may take a few seconds, but the result is stored in memory, speeding up subsequent access.
To update the list of available terminals, select the **\_update hosts** option.
* The **"Current terminal"** dropdown menu shows all available terminals.
* The **"Default host"** value always points to the **local terminal**, unless the administrator redefines the default configuration in `audicom.ini`.
* If you select an **On-Air terminal**, its **programming files** will be displayed, allowing you to work directly with its **LOG/PGM**.
When deploying the menu for the first time, the system scans the network for **active AUDICOM terminals**.\
This process may take a few seconds, but the result is stored in memory, speeding up subsequent access.
To update the list of available terminals, select the **\_update hosts** option.