> ## Documentation Index
> Fetch the complete documentation index at: https://docs.solidyne.ar/llms.txt
> Use this file to discover all available pages before exploring further.
# UDX-2MIC Adapter
> Two-microphone expansion
## Overview
UDX 2MIC is a pre-amplification unit for **two microphones**.
* It features switchable *48V phantom power* controlled from the surface touch screen.
* On the mixer, it is assigned to two channels, which are configured to operate in the same way as channels assigned to rear panel inputs.
## Connections
UDX 2MIC connects to the console through a **UNIDEX input**, using a straight-through STP RJ45-RJ45 cable (SOL-P50 or SOL-P25 cables). Next wiring diagram shows the connection to UNIDEX UX24.
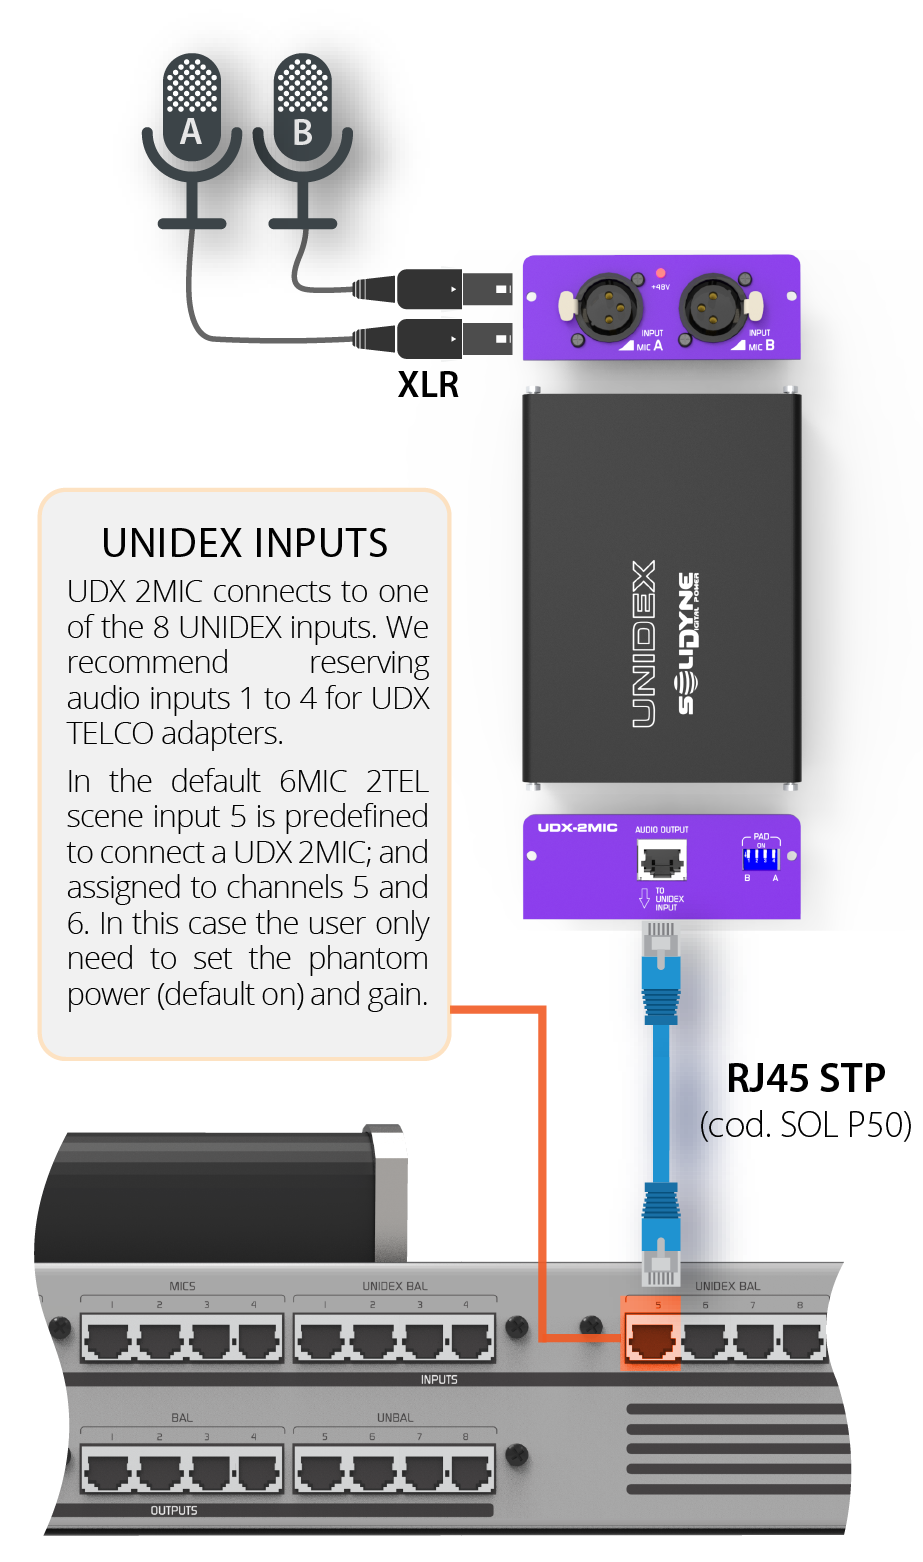 The cable connecting UDX 2MIC to the UNIDEX input carries voltage when 48V phantom power is enabled. Turn off the phantom power before unplug it.
We recommend reserving inputs 1 to 4 for TELCO (UDX 2TEL; TEL BT; 2BLT) since these adapters use the outputs connectors aligned with inputs 1 to 4.
### Microphones
Microphones connect to the UDX 2MIC adapter using standard XLR cables. If the microphones require *phantom power*, this can be activated later from the console.
UDX 2MIC features **10dB input attenuation** switchable via dip-switches. Switches labeled A and B control attenuation for inputs A and B respectively (center switches are not used).
The cable connecting UDX 2MIC to the UNIDEX input carries voltage when 48V phantom power is enabled. Turn off the phantom power before unplug it.
We recommend reserving inputs 1 to 4 for TELCO (UDX 2TEL; TEL BT; 2BLT) since these adapters use the outputs connectors aligned with inputs 1 to 4.
### Microphones
Microphones connect to the UDX 2MIC adapter using standard XLR cables. If the microphones require *phantom power*, this can be activated later from the console.
UDX 2MIC features **10dB input attenuation** switchable via dip-switches. Switches labeled A and B control attenuation for inputs A and B respectively (center switches are not used).
 ## UNIDEX Input Configuration
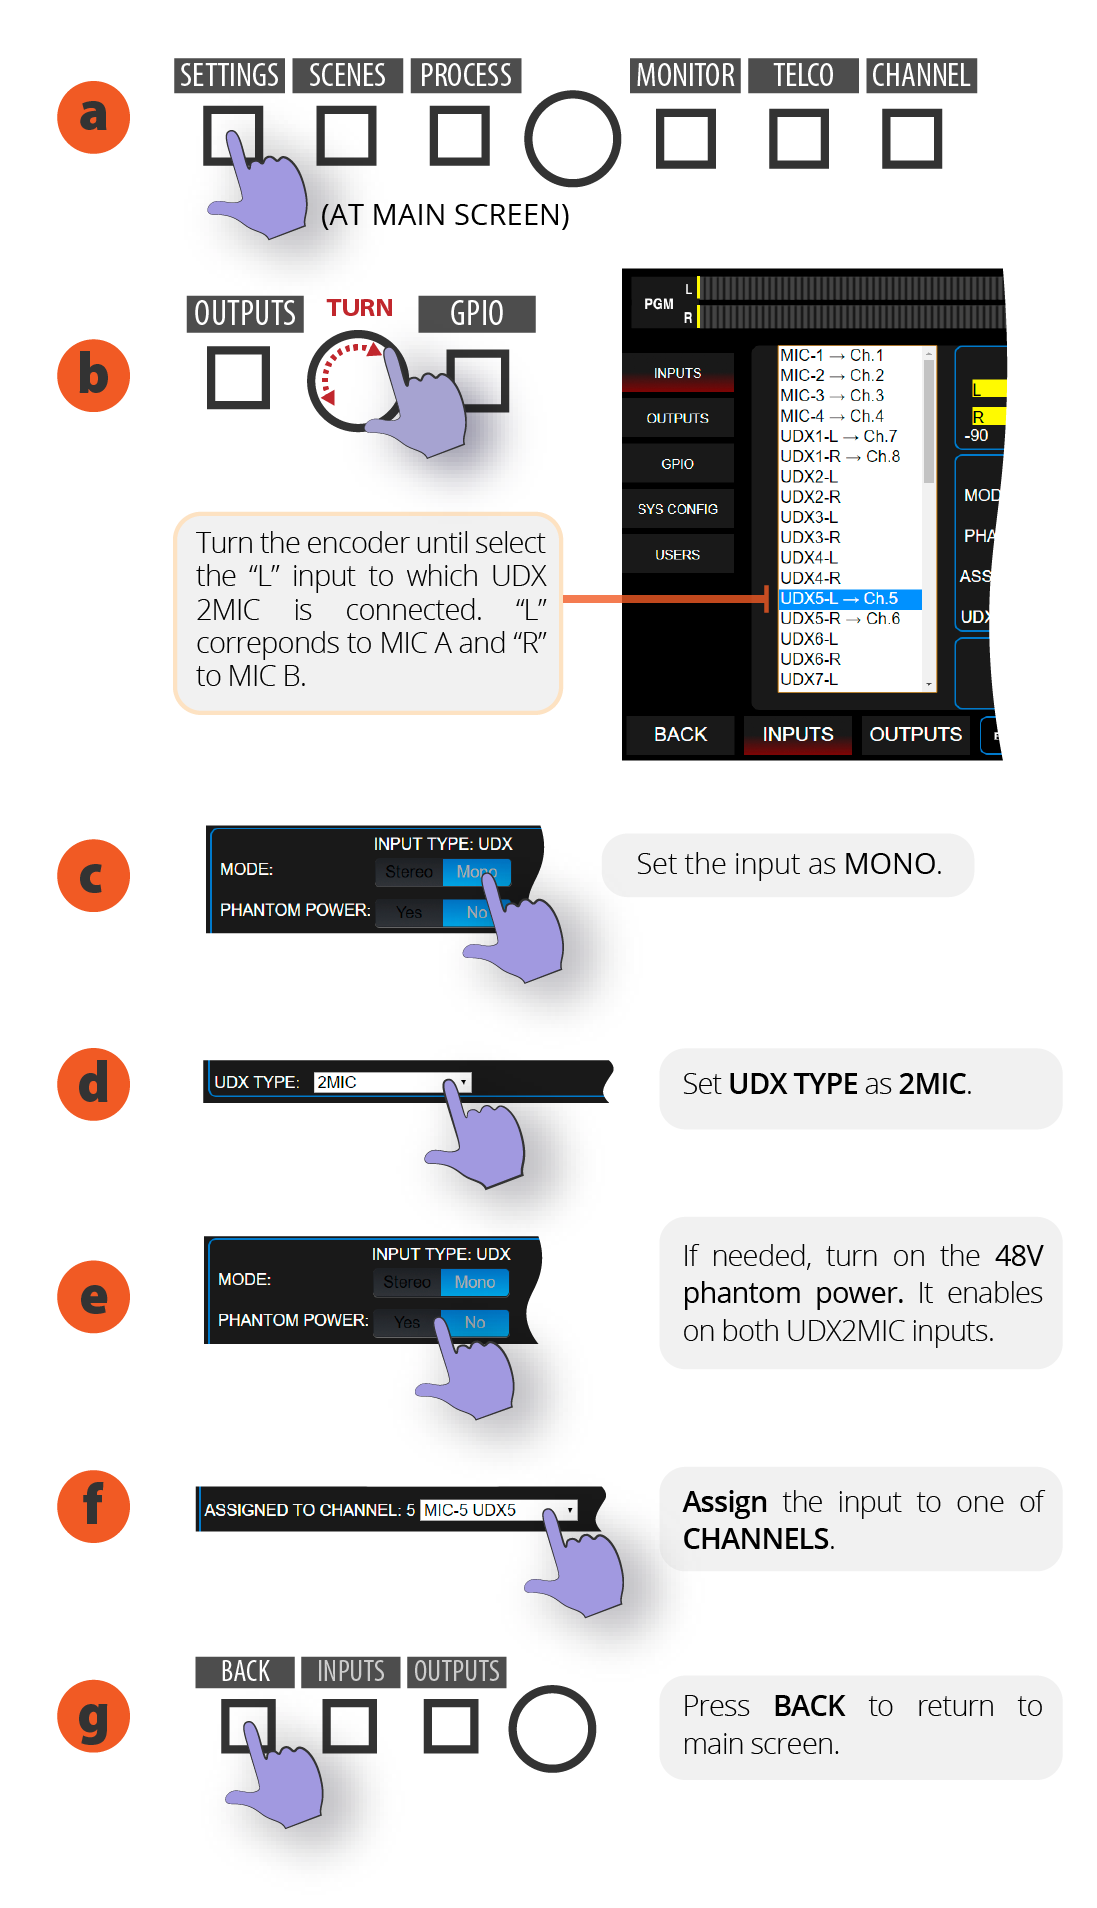
Below is the configuration process from the console touch screen. This can also be done similarly through the web control interface.
1. On the main screen, access the **SETTINGS** option.
2. Turn the encoder to select the **"L" channel** of the UNIDEX input where UDX 2MIC is connected. "L" corresponds to channel A of UDX 2MIC while "R" is channel B.
3. Tap **MODE** to select **MONO**.
4. In the **UDX TYPE** menu select: **2MIC**.
5. If required, enable **48V power**. This will activate for both inputs.
6. On the screen, tap ASSIGNED TO CHANNEL menu to **assign a CHANNEL** to the input. If you choose a channel that already has an input assigned, a warning will appear. If you continue, the input on that channel will be replaced.
7. Press BACK to return to main screen.
8. The next step will be to configure the channel.
The layout and shape of the controls shown below may vary. This does not affect the configuration procedure.
## UNIDEX Input Configuration
Below is the configuration process from the console touch screen. This can also be done similarly through the web control interface.
1. On the main screen, access the **SETTINGS** option.
2. Turn the encoder to select the **"L" channel** of the UNIDEX input where UDX 2MIC is connected. "L" corresponds to channel A of UDX 2MIC while "R" is channel B.
3. Tap **MODE** to select **MONO**.
4. In the **UDX TYPE** menu select: **2MIC**.
5. If required, enable **48V power**. This will activate for both inputs.
6. On the screen, tap ASSIGNED TO CHANNEL menu to **assign a CHANNEL** to the input. If you choose a channel that already has an input assigned, a warning will appear. If you continue, the input on that channel will be replaced.
7. Press BACK to return to main screen.
8. The next step will be to configure the channel.
The layout and shape of the controls shown below may vary. This does not affect the configuration procedure.
 You can analyze the configuration of one of the preset scenes that have channels configured for UDX 2MIC as a reference.
## Channel Configuration
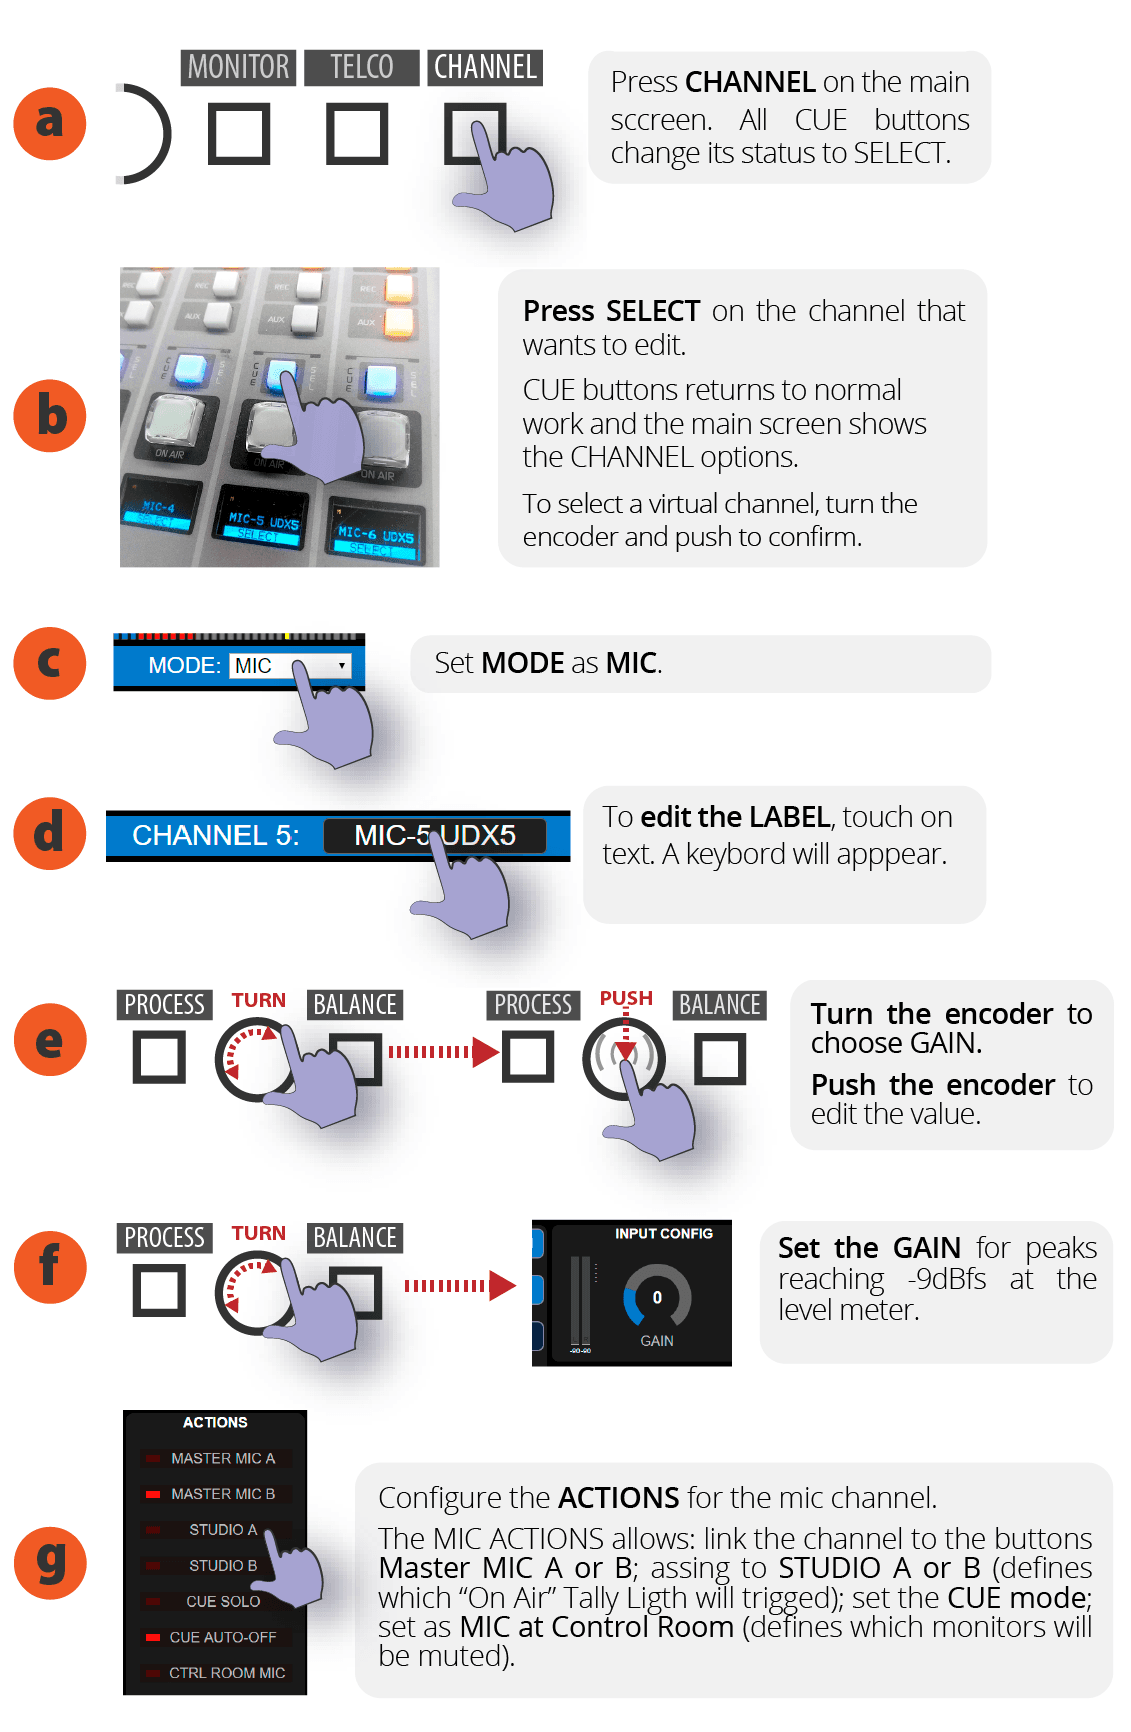
1. On main screen, press **CHANNEL**. CUE buttons change to SELECT mode.
2. Press the **CUE/SELECT** button on the channel to configure. The console exits SELECT mode and shows the CHANNEL screen for the selected channel. To select virtual channels, turn the encoder and press to confirm.
3. Under **MODE**, expand the menu and select **MIC**.
4. To edit the **label**, touch the name. An on-screen keyboard will appear.
5. Turn encoder to select **GAIN**. Press encoder to edit the value.
6. **Adjust the GAIN** of the input so that when speaking into the microphone, peaks reach -9dBfs on the level indicator.
7. Touch the screen to define **ACTIONS** for that microphone channel. Actions allow:
* Link to Master MIC A/B button
* Link to STUDIO A/B (determines which "ON AIR" light activates)
* Define CUE mode
* Define the channel as Control Room microphone (determines which monitoring is muted).
8. **Save the SCENE** to record the changes.
You can analyze the configuration of one of the preset scenes that have channels configured for UDX 2MIC as a reference.
## Channel Configuration
1. On main screen, press **CHANNEL**. CUE buttons change to SELECT mode.
2. Press the **CUE/SELECT** button on the channel to configure. The console exits SELECT mode and shows the CHANNEL screen for the selected channel. To select virtual channels, turn the encoder and press to confirm.
3. Under **MODE**, expand the menu and select **MIC**.
4. To edit the **label**, touch the name. An on-screen keyboard will appear.
5. Turn encoder to select **GAIN**. Press encoder to edit the value.
6. **Adjust the GAIN** of the input so that when speaking into the microphone, peaks reach -9dBfs on the level indicator.
7. Touch the screen to define **ACTIONS** for that microphone channel. Actions allow:
* Link to Master MIC A/B button
* Link to STUDIO A/B (determines which "ON AIR" light activates)
* Define CUE mode
* Define the channel as Control Room microphone (determines which monitoring is muted).
8. **Save the SCENE** to record the changes.
 TO PERMANENTLY STORE THE SETTINGS, **SAVE THE SCENE**.